Attention all hardworking billers, you’re going to love this new awork Premium feature!
At the end of this year, we’ve added some really cool new features for you and your team to make working in awork even easier: Invoice Tool Integrations!
From now on, you can have your recorded times in awork directly converted into an invoice, edited, and sent to your clients. From now on, we have integrated three invoicing tools in awork for you to choose from. Since you can only evaluate your times individually with the premium feature, the integration of invoicing tools is also a premium feature.
In this article, we explain what the new feature in awork can do and how it works.
Create invoices with awork
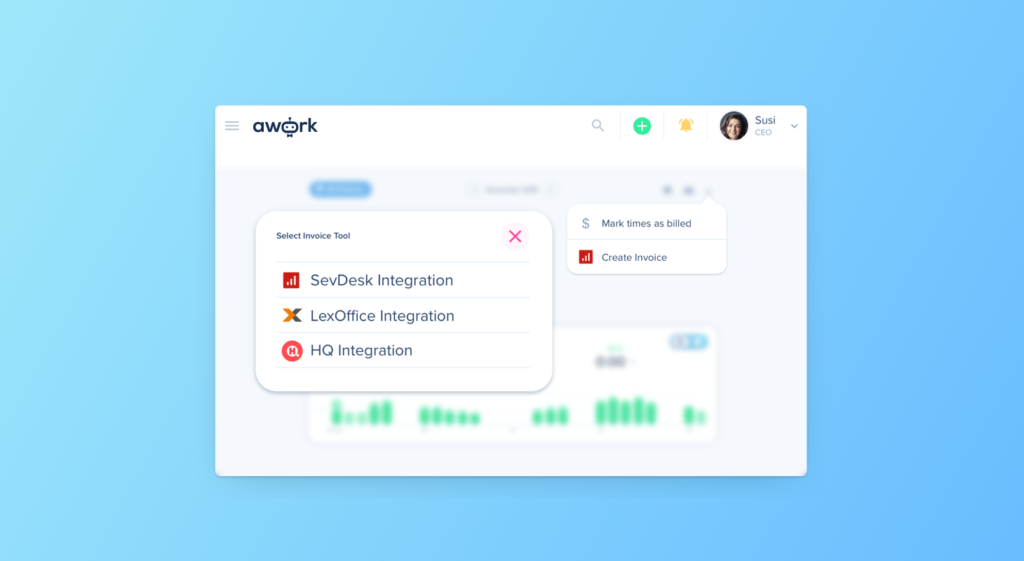
With the awork Premium Plan, you can not only individually evaluate your recorded times, but from now on, also invoice them directly. We have integrated three invoicing tools:

Connect your awork account with the invoice tool
The prerequisite is that you first create a link between the tool and awork. This can be done via the API of the program.
If you need help, check out our help center article here, where we have summarized everything you need to enter the API token and link the invoice tool to your awork. You can also find the link to set up the API in the corresponding awork window.

Create an invoice with invoice tools
From your time evaluations (you can find them in the menu on the left side under Workspace), you can easily get to the selection of invoicing tools. Alternatively, you can also go to the integrations in the awork menu and select an invoice tool.
In your time evaluations, you now have the possibility to select one or more filters that you would like to have evaluated. Then click on the dollar sign and select Create Invoice.
Now an extra window opens where you can choose between three invoice tools.
Select an existing invoice or create a new one
If you have selected one of the three invoice tools, another window will open, which already offers you a small graphical representation of your billable times.
Now you can decide (depending on the selected integration) if you want to edit an already existing invoice or if you want to create a new one. In case you are trying this integration for the first time, just select the option in which you create a new invoice.
Depending on the filters you have set in your time evaluation, awork will offer you the appropriate choices of items to appear on your invoice.

In the next step, you can give the invoice a name and set a price for your billable hours. At this point, you also have the possibility to add further positions to your invoice or to delete others. In addition, you can easily sort and arrange the individual positions using drag-and-drop.
In the fifth step, you can decide if you want your times to be marked as billed or if you just want to ignore this step.
Your times – your invoice
By clicking on Create Invoice, you will be redirected to the corresponding tool.
After you have logged in, you will see your invoice, including your times from awork. Here you still have the possibility to fill in some fields with the required information, such as the customer, the invoice date, or the subject.
If you create a new invoice in awork, then choose a meaningful subject, because this name will also be how you find this invoice afterward in awork. This is very useful if you want to change the invoice later and add other positions and times.
Very important: Only when you save your invoice in the invoice tool will it be suggested to you as an invoice in your awork, allowing you to be able to edit it. This currently works with sevDesk and HQ.
For whom is this feature made for?
In principle, this new feature is beneficial for all awork users who want to continue calculating their times.
The following initial situation: You are working with your team on the creation of a new website for a client. This project, for example, involves some juniors but also a senior graphic designer. This means that your times have to be billed differently since a senior’s hours are more expensive than a junior’s.
The client may not only have hired your firm to do this one project, but you are also developing a new online marketing strategy for them at the same time.
Since the client pays you by the hour, the hours are recorded on the two projects by all the colleagues involved. Thanks to the individual time evaluation in awork, you can show the client a breakdown of the individual employees or the two projects.
With the new invoice tool, you can specify both the position and the price.
With the new feature, you can now also send the customer an invoice directly from the recorded times per project. All you have to do is set the appropriate filters in the time evaluations that should appear on the invoice (e.g., filter by project and by individual employees), and you can then use one of the three invoicing tools to further calculate your times.
Special tip: If you want to start creating the invoice already, but the project is not finished yet, you can simply save the invoice in awork and access it again later to continue working on it (currently only in HQ and sevdesk).